


The heart of any kitchen is undoubtedly the stove, and when it comes to electric stoves, the cooktop is the star of your culinary adventures. Whether you're facing a malfunctioning burner or dreaming of upgrading to a sleek, modern cooking surface, knowing how to replace an electric stove top can save you both time and money. This guide is your ultimate companion, walking you through every step of the process so you can tackle this home improvement task with confidence and ease.
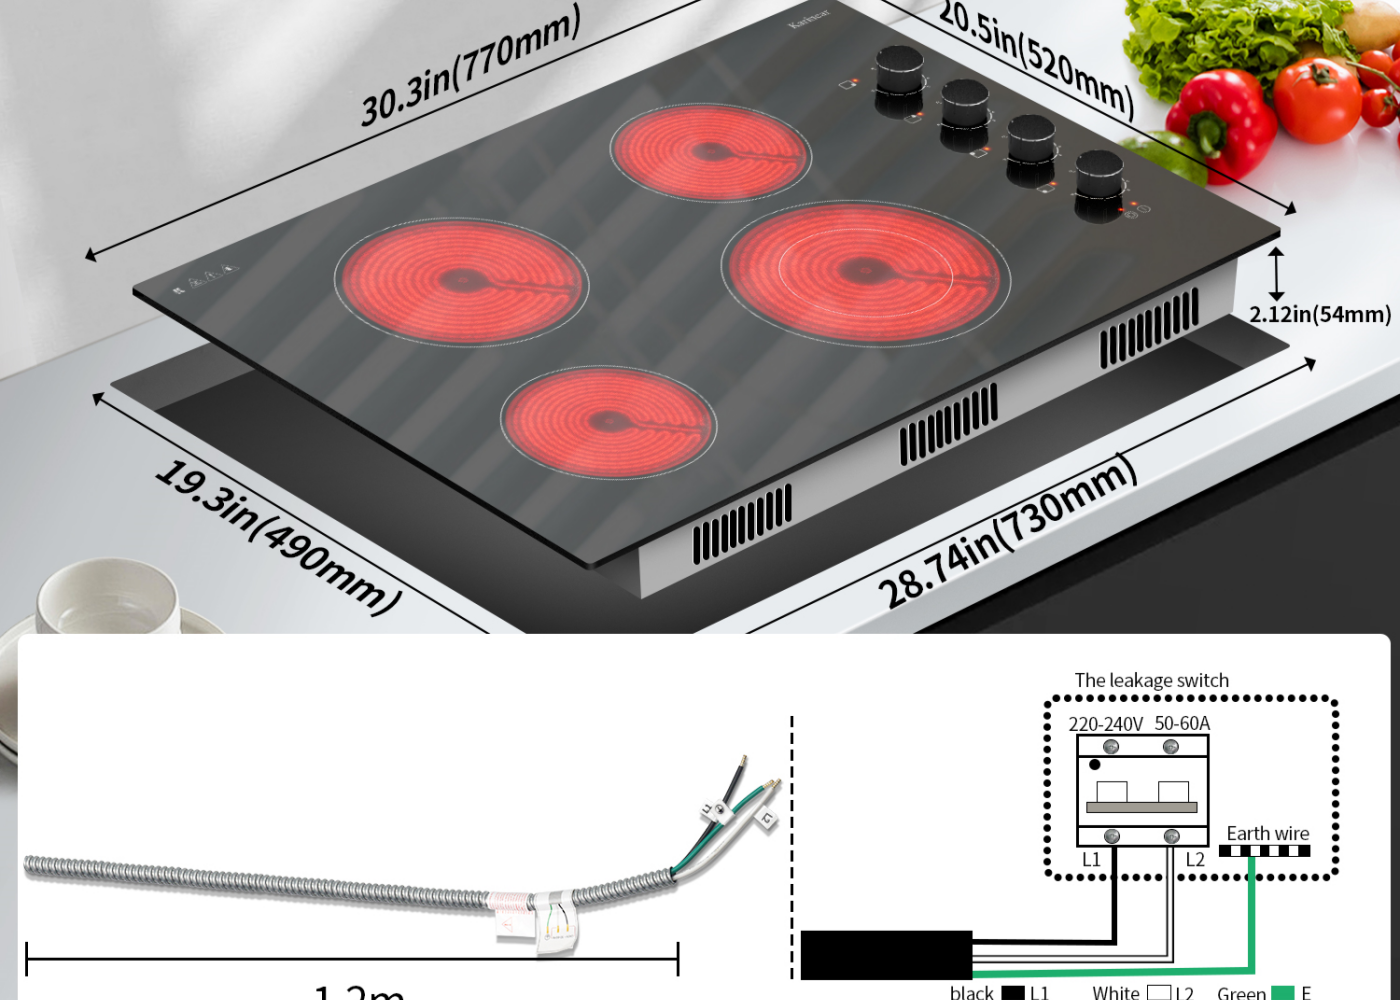
Before we dive into the details, it’s important to note that electric stove tops come in various styles, including classic coil burners, smooth glass surfaces, and high-tech induction cooktops. Each type has its own unique charm and replacement process. In this guide, we’ll focus on the most common and versatile option: the electric stove top with coil burners.
But here’s the best part—replacing your stove top doesn’t have to be daunting. With the right tools, a bit of patience, and our step-by-step instructions, you’ll have your kitchen back in action in no time. And remember, safety always comes first. If you ever feel unsure or uncomfortable, don’t hesitate to call in a professional. Ready to transform your kitchen and elevate your cooking game? Let’s get started on this exciting journey to refresh the heart of your home!
Signs That Your Electric Stove Top Needs Replacement
Before you embark on replacing your electric stove top, it's important to determine whether a replacement is truly necessary. Here are some telltale signs that your stove top might need replacing:
-
Inconsistent heating: If your burners heat unevenly or fail to reach the desired temperature, it could indicate a problem with the heating elements.
-
Visible damage: Cracks, chips, or other physical damage to the stove top surface can pose safety risks and affect cooking performance.
-
Frequent malfunctions: If you find yourself constantly troubleshooting issues with your stove top, it might be more cost-effective to replace it.
-
Age: Most electric stove tops have a lifespan of about 13-15 years. If yours is approaching or exceeding this age, replacement might be a wise choice.
-
Energy inefficiency: Older models tend to consume more energy. Upgrading to a newer, more efficient model could lead to long-term savings on your energy bills.
By recognizing these signs early, you can make an informed decision about whether to repair or replace your electric stove top. Remember, safety should always be your primary concern when dealing with electrical appliances in the kitchen.

Preparing for the Replacement
Before you dive into the actual replacement process, proper preparation is key to ensuring a smooth and safe experience. This section will guide you through the essential steps to take before you start working on your electric stove top.
Safety First: Disconnecting Power
The first and most crucial step in preparing to replace your electric stove top is to ensure your safety by disconnecting the power supply. Here's how to do it:
- Locate your home's circuit breaker box.
- Identify the breaker that controls power to your kitchen or specifically to your stove.
- Switch off the appropriate breaker.
- Double-check that the stove is indeed without power by attempting to turn on a burner.
Remember, electricity can be dangerous, and it's always better to be overly cautious. If you're unsure about which breaker controls your stove, it's safer to turn off the main power supply to your home.
Gathering Necessary Tools and Materials
Having the right tools at hand will make your replacement task much easier. Here's a list of items you'll likely need:
- Screwdriver set (flathead and Phillips head)
- Pliers
- Work gloves
- Flashlight
- Multimeter (for testing electrical connections)
- New electric stove top (ensure it's compatible with your stove model)
- Owner's manual for your stove (if available)
It's always a good idea to have these tools ready before you start, to avoid interrupting your work to search for a missing item.
Clearing the Work Area
A clear and organized workspace is essential for a smooth replacement process. Follow these steps to prepare your work area:
- Remove all items from the stovetop and surrounding counters.
- Clean the stove top and surrounding area to prevent debris from interfering with the replacement.
- Ensure you have adequate lighting in your work area.
- If possible, place a drop cloth or old towels around the stove to protect your floor from any falling debris or parts.
By taking these preparatory steps, you're setting yourself up for a successful and safe electric stove top replacement. Remember, if at any point you feel unsure about the process, it's always best to consult a professional.
Removing the Old Electric Stove Top
Now that you've prepared your workspace and gathered your tools, it's time to remove the old electric stove top. This process may vary slightly depending on your stove model, but the general steps remain consistent. Always refer to your stove's manual for model-specific instructions.
Accessing the Stove Top
To begin the removal process, you'll need to access the underside of the stove top electric. Here's how:
- Open the oven door and locate the screws at the front of the cooktop frame.
- Remove these screws carefully, setting them aside in a safe place.
- Gently lift the front of the cooktop. Most models are hinged at the back and will lift like a car hood.
- If your model doesn't lift easily, check for additional screws or clips holding it in place.
Once you've lifted the cooktop, you should have a clear view of the underside components.
Disconnecting Electrical Connections
With the cooktop lifted, you'll see the electrical connections for each burner. Follow these steps to safely disconnect them:
- Identify the wire harnesses connecting each burner to the main wiring.
- Take a photo or make a diagram of the connections to ensure correct reassembly later.
- Carefully unplug each wire harness. Some may have locking tabs that need to be pressed to release.
- If any connections are screwed in place, use your screwdriver to loosen and remove them.
Remember, handle all wiring with care and avoid pulling on the wires themselves.
Final Removal of the stove top electric
With all components removed, you can now take out the entire stove top electric:
- Check for any remaining screws or fasteners holding the cooktop in place.
- Gently lift the cooktop, being mindful of any sharp edges.
- If the cooktop doesn't come free easily, double-check for any missed connections or fasteners.
Once the old stove top is removed, set it aside carefully. You're now ready to install the new electric stove top!
Conclusion
Replacing an electric stove top might seem like a daunting task at first, but with the right preparation, tools, and knowledge, it's a project that many homeowners can tackle successfully. By following this comprehensive guide, you've learned how to safely remove your old stove top, install a new one, and ensure it's working correctly.